
Gradual Change Effect
Here I want to show you how to combine motion tween designing and ActionScript editing to make perfect effect.
Series: SWF Quicker 2.0
Estimated Time of Completion: 30 minutes
Prepared work: download Sothink SWF Quicker -- http://www.sothink.com/product/swfquicker/download.htm
1 Launch SWF Quicker 2.0, set the size of the canvas as Width: 372; Height: 150; Background: blue (R: 51, G: 102, B: 204); Frame rate: 30.
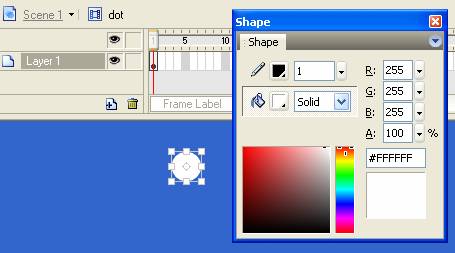
2 Press Ctrl+F8 to create a new movie clip and name it "dot". Draw a round on the canvas and set its size as Width: 3; Height: 3; Fill color: white. Set its position as (0, 0).
3 Create a new movie clip named "move_dot". Drag "dot" from library to canvas and set its position as (0, 0). Use pen guide line tool to draw a motion path.

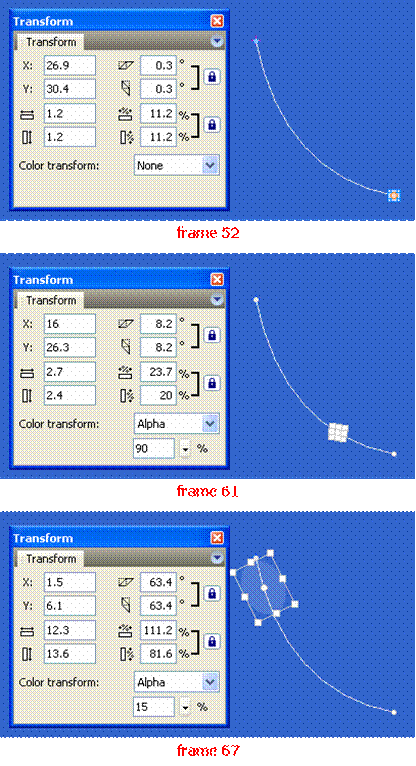
4 In timeline, extend the frame to Frame 67. Insert a keyframe in frame 52, 61, and 67 respectively. Set the zoom and alpha value for movie clip "dot" in Transform panel as shown in following illustrations:
Create motion tween as follows. In frame 1, enter 100 as ease value of "Move" in properties panel. In frame 52, change the value to 100.

TIP: This step is to make buffer effect.
Ease: Adjust the rate of change between tweened frames.
To begin the motion tween slowly and accelerate the tween toward the end of the animation, drag the slider up or enter a negative value between -1 and -100.
To begin the motion tween rapidly and decelerate the tween toward the end of the animation, drag the slider down or enter a positive value between 1 and 100.
5 Insert a blank keyframe in frame 68 and add following ActionScript which means to remove the movie clip when the movie clip ends.
| Code: |
| this.removeMovieClip(); |
6 Create a movie clip and name it "s", we are now to create text effect. Back to observe the movie, we know this gradual change effect is composed of two parts, the former one is the effect which looks like splash effect but actually is displaying multiple movie clips "move_dot"; the latter is the text effect. According to the order of the two parts, we should empty frames for the former effect in movie clip "s".
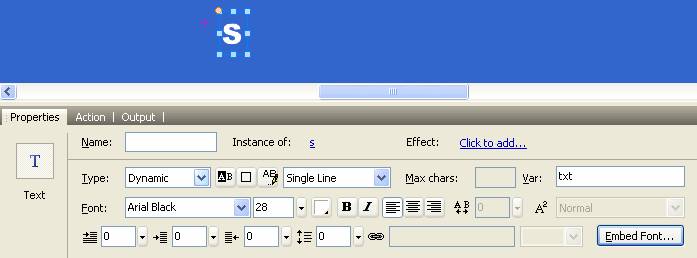
Insert a keyframe in frame 78 and extend to frame 85. Click frame 78 and draw a dynamic text block, I show you the text properties as follows. Please notice the Var is "txt" and position is (15, -10).
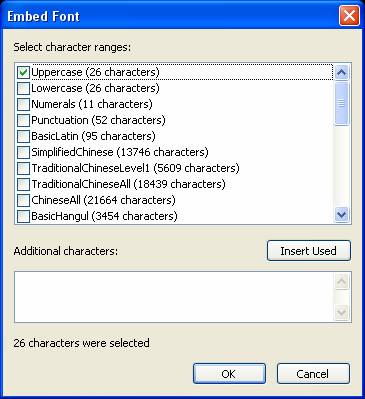
Note: Embedding font is important for dynamic text that needs to be rotated or used in masked layer and you need mask to make text effect here. In this movie, we embed Uppercase (you can also embed other ranges as desired).
7 Insert a new layer and insert a keyframe in frame 78. We now draw a rectangle as a mask, which rotates about -35 degrees. Insert a keyframe in frame 85 and adjust the rectangle to cover text block completely. Create a motion tween between frame 78 and 85. Right click layer 2 and choose mask in context menu, then right-click layer 1 and choose masked.

8 Add following ActionScript in frame 85.
| Code: |
| stop(); |
9 Create a movie clip and name it move. Drag "s" from library to canvas, set its position as (3, 15), enter "letter" as its instance name. Insert a new layer and drag "move_dot" to canvas, the position is (0, 0), enter "move" as its instance name. Click “letter” on the canvas and add following ActionScript:
| Code: |
| //get current characters from variable "_root.text" onClipEvent(load) { i=Number(_parent._name.substr(4,1)); this.txt=_root.text.substr(i-1,1); } |
10 Insert a new lay and add ActionScript:
| Code: |
| w = 10; h = 10; angle = 35; m = w + h; move._visible = false; i = 1; mc = 1; //duplicate some movie clip "move" and set different coordinates and angles for them. Use delete command to delete function "onEnterFrame" when they get enough numbers. function onEnterFrame() { if (i > m) { delete onEnterFrame; } // end if y = 1; x = i; if (i < h) { k = i; } else if (i > w) { k = m - i + 1; y = i - w; x = w; } else if (w >= i >= h) { k = h; } // end if for (l = 1; l <= k; l++) { x = x - 1; y = y + 1; duplicateMovieClip("move", "move" + mc, mc); setProperty("move" + mc, _x, x * 4); setProperty("move" + mc, _y, y * 4); setProperty("move" + mc, _rotation, mc * angle); mc++; } // end of for i++; } |
11 Back to main movie and add following ActionScript in frame 1.
| Code: |
| var text:String = "SOTHINK"; |
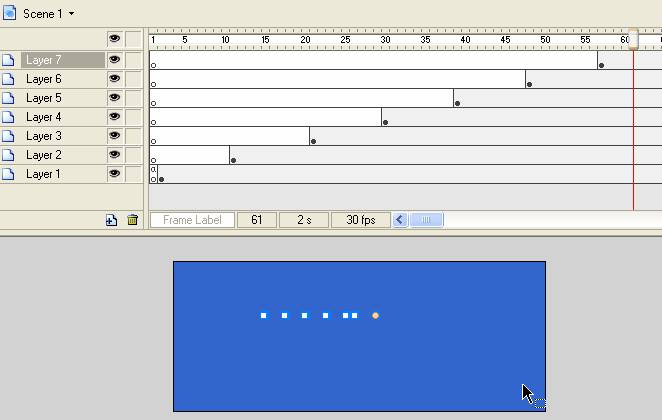
12 Insert a key frame in frame 2, drag "move" from library. Since character string includes 7 characters, we should drag 7 "move" to canvas in turn. Please remember to enter word1, word2… word7 as instance name for them. After that extend frames in each layer to 170. I show you timeline here.
Note: The font used in this tutorial is Arial Black, which is not monospaced font; you need to adjust the space between these "move"
See more details, please click change.rar (5.28 KB) to download source file.