
How to Make a Gradient Color
This tutorial focuses on showing you a popular skill in creating Flash - making gradient color. You can have a special effect from making gradient color and overlapping shapes.
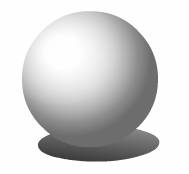
Just like this:

Series: SWF Quicker 2.0
Estimated Time of Completion: 25 minutes
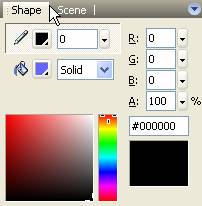
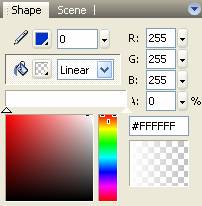
1. In shape panel, direct input R: 102, G: 102, B: 255 on the right. Set the line width as 0.
2. Select round rectangle tool and input 20 in the value box located in the bottom of tool panel. Draw a round rectangle on the canvas.
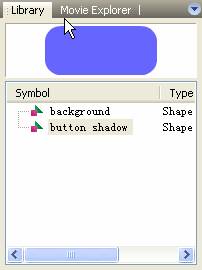
3. In Library, rename shape symbol as "background". Right-click symbol "background" in Library and choose copy, then right-click again to choose paste, you can get a duplicatate of symbol "background". Rename it as "button shadow".
4. Insert a new layer -- layer 2 and drag symbol "button shadow" to the canvas in layer2. Make sure the instance of symbol "background" is placed under the instance of symbol "button shadow". To align the button shadow and background perfectly, we can set the alignment in Layout panel. First, please select the two shapes on the canvas, and then click Align center and Align middle.

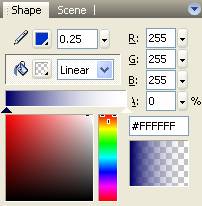
5. Select the instance of symbol "button shadow". First, set the line color and line width: Line color is R: 0, G: 51, B: 204, line width: 0.25. Then set the fill style in shape panel as linear. After you choose Linear in Fill style drop-down menu, the gradient definitions bar shows up, with a pointer at each end. A pointer looks like a small triangle, representing a color in the gradient. Select the left pointer and set the color as R: 0, G: 0, B: 102. Set the color of right point as white.
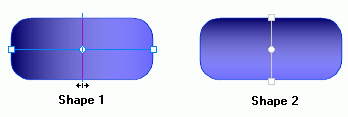
6. Select fill transform tool and click button shadow, a control line with a center point and a handle at each end will appear inside, drag one handle to make the control line vertically. See the difference between the following two shapes? The gradient of shape 1 is from left to right; the other one is from top to bottom.
7. Make a duplicate of symbol "button shadow" in Library and rename it as "light".
8. Insert a new layer and drag symbol "light" to the canvas. Make the three shapes overlapped completely by using Align options in layout panel. Select "light", set the line width as 0. Select the left pointer and set the color as white, Alpha value as 100%, the color of right pointer as white, Alpha value as 0.
9. Select the instance of symbol "light" on the canvas and adjust its size and position like this:

10. That is the crystal button we want. You can add some characters on it.

TIP: The Fill color is the color of an entirely enclosed area, where can be filled with solid color, gradient colors (linear and radial color) and bitmap by using SWF Quicker, We take linear color as an example in this lesson. Other ways are also quick and easy to master. Go for it!